
Website localization is a collaborative effort. Between project managers configuring settings, developers verifying code, and human translators reviewing text, you need a centralized workspace where your whole team can operate smoothly.
MultiLipi allows you to invite multiple users to your workspace and assign specific roles to keep your localization pipeline secure and organized.
Important Update: The New In-App Invitation Flow
To enhance security, prevent phishing, and ensure invitations never get lost in spam folders, MultiLipi has transitioned away from email-based invites. All team invitations are now handled directly inside the MultiLipi dashboard. This makes the entire onboarding process faster, safer, and more reliable for every team size.
Prerequisite: The Invitee Must Have an Account
One quick step before sending the invitation.
Because invitations are sent via the dashboard, the person you are inviting must create a free MultiLipi account first using the exact email address you plan to invite.
Once they have signed up and logged in at MultiLipi dashboard, you can proceed with the steps below.
Phase 1: How to Send a Team Invitation
For Workspace Owners & Administrators.
Navigate to the Team Dashboard
Log in to your MultiLipi account. On the left-hand navigation panel, click on the Team tab to open your workspace member management area.
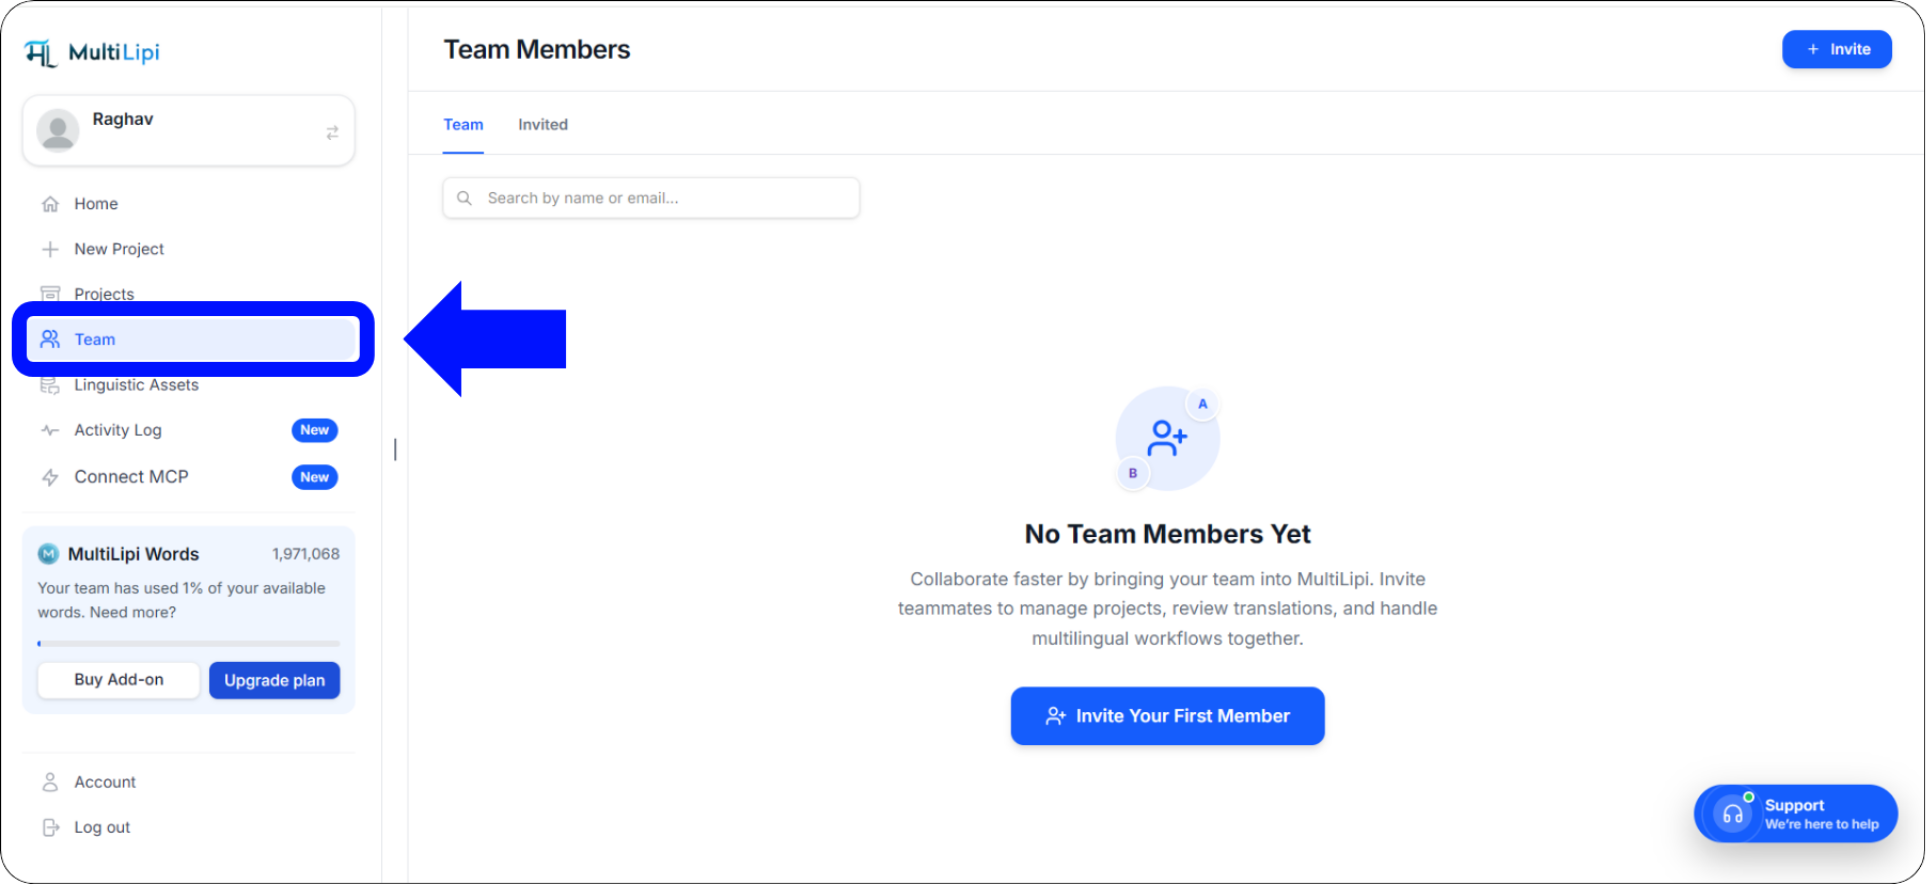
The Team tab in the left-hand navigation panel — your workspace member management hub
Initiate the Invite
If your workspace is currently empty, click the prominent blue Invite Your First Member button in the center of the screen.
If you already have members, click the + Invite button in the top right corner of the Team dashboard.
Configure User Details and Permissions
An "Invite Team Members" pop-up window will appear. Fill out the following details:
Member Email ID
Enter the exact email address your colleague used to sign up for MultiLipi. Even a single character typo will cause the invitation to fail.
Select Role
Choose their permission level — Administrator for full access, or Contributor for translation-focused access without account settings control.
Specific Projects Access
By default, invited users have access to all projects in your workspace. Check this box if you only want them to access specific websites within your account.
Send the Invite
Review the details one final time, then click the blue Send Invitation button. The invitation will appear instantly inside your colleague's MultiLipi dashboard — no email required.
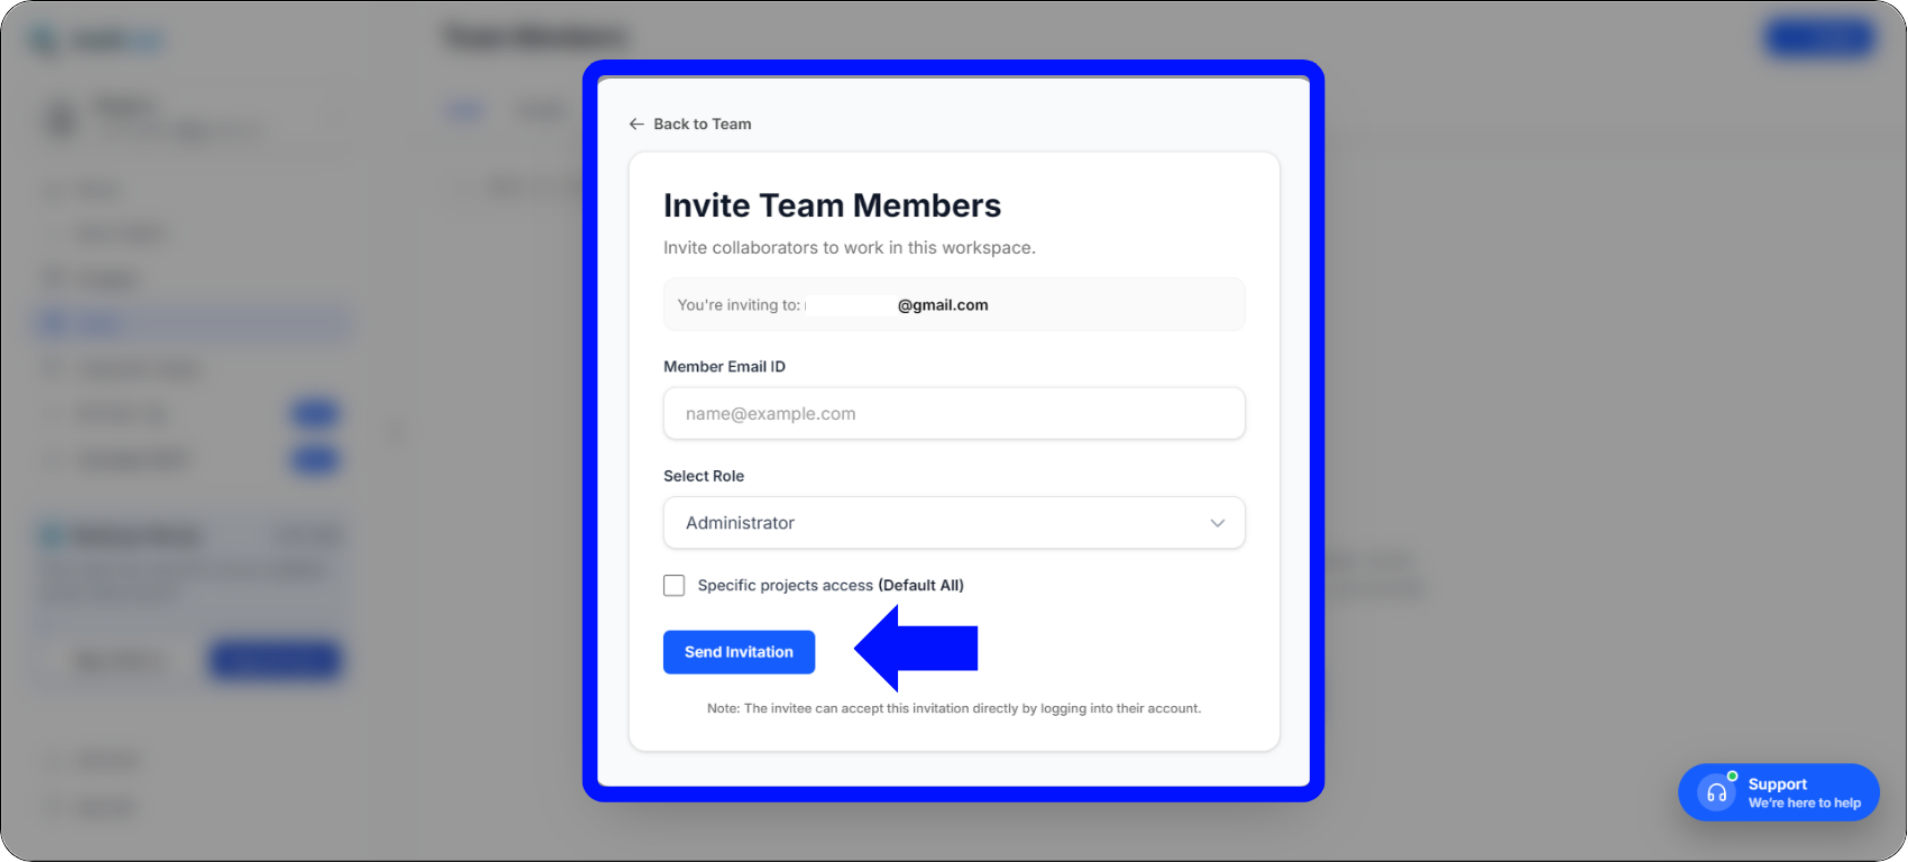
Invite Team Members modal — configure email, role, and project access before sending
Phase 2: How to Accept a Team Invitation
For the team member being invited — just two clicks.
If you are the team member receiving the invitation, joining the workspace takes just two clicks — no email confirmation, no link expiry, no spam folder hunting.
Check Your Dashboard Notifications
Log in to your MultiLipi account. Look at the left-hand navigation panel — you will see a red notification badge with a number next to the Team tab. This badge indicates pending workspace invitations waiting for your response.
Accept the Invitation
Click on the Team tab. At the top of the screen, you will see a blue banner labeled Workspace Invitations — it displays who invited you and the role you have been assigned.
Click the blue Join button to instantly connect to the workspace and gain access to your assigned projects.
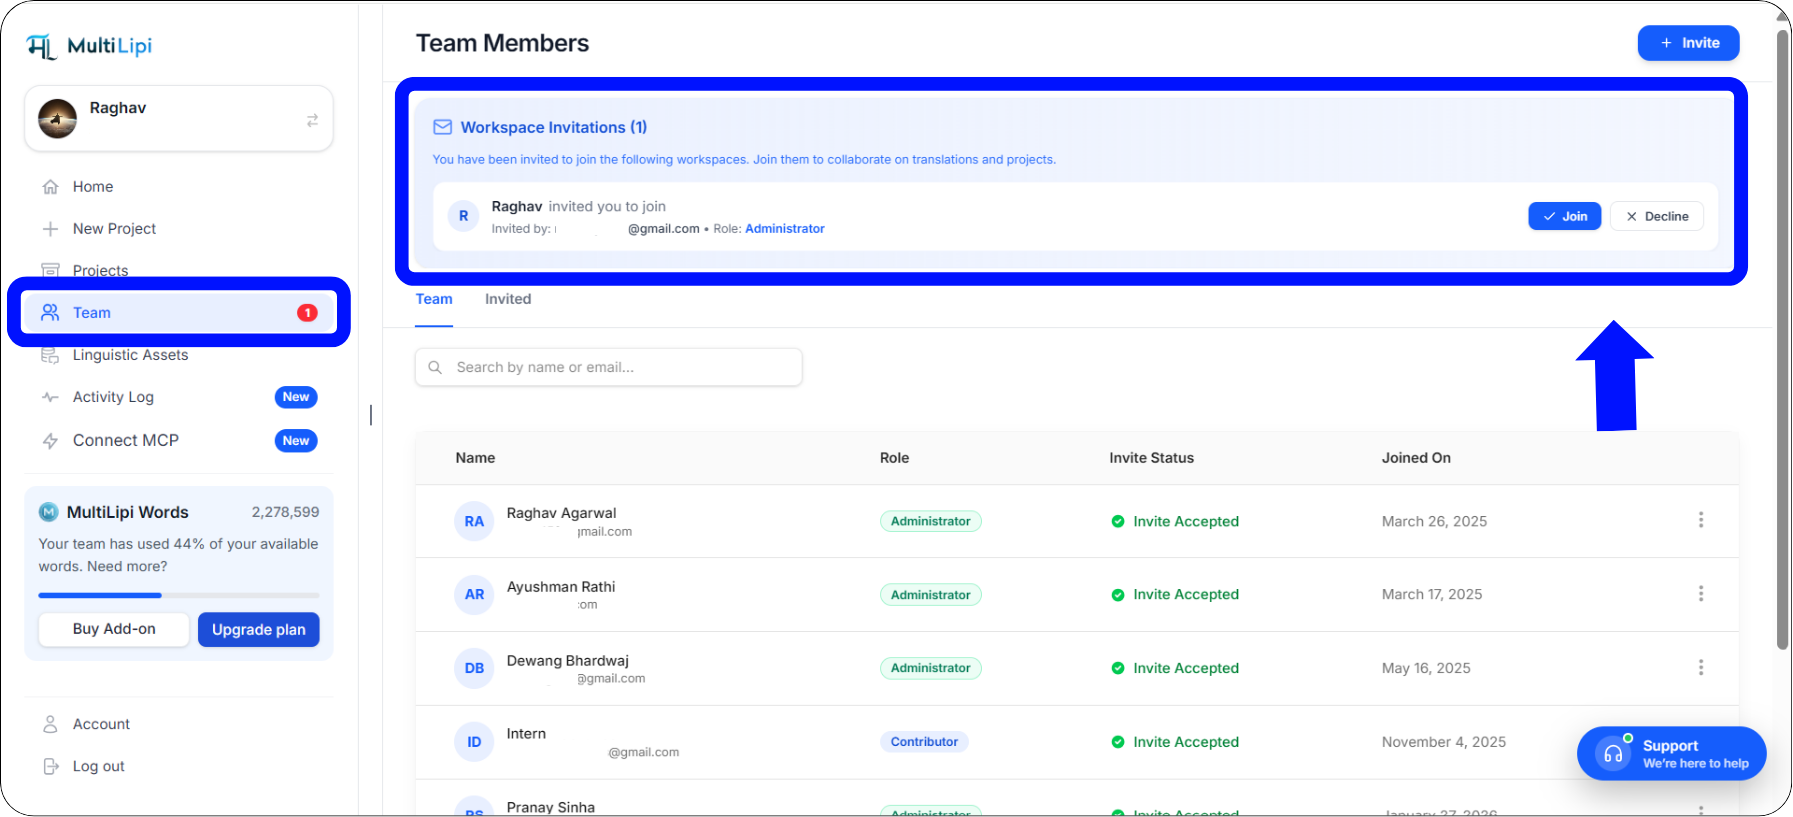
The Workspace Invitations banner — accept with a single click on the Join button
Phase 3: Modifying Roles or Removing Members
Administrators retain full control at all times.
As your team scales or shifts responsibilities, Workspace Administrators retain full control over who has access to the platform. You can change a user's role or remove them entirely at any time — changes take effect immediately.
Go to the Team tab to view your active roster of current members.
Locate the team member you wish to modify in the list.
On the far right side of their row, click the three vertical dots (⋮) to open the action menu.
Select Edit to change their assigned role or project access, or select Delete to immediately revoke their access to your workspace.
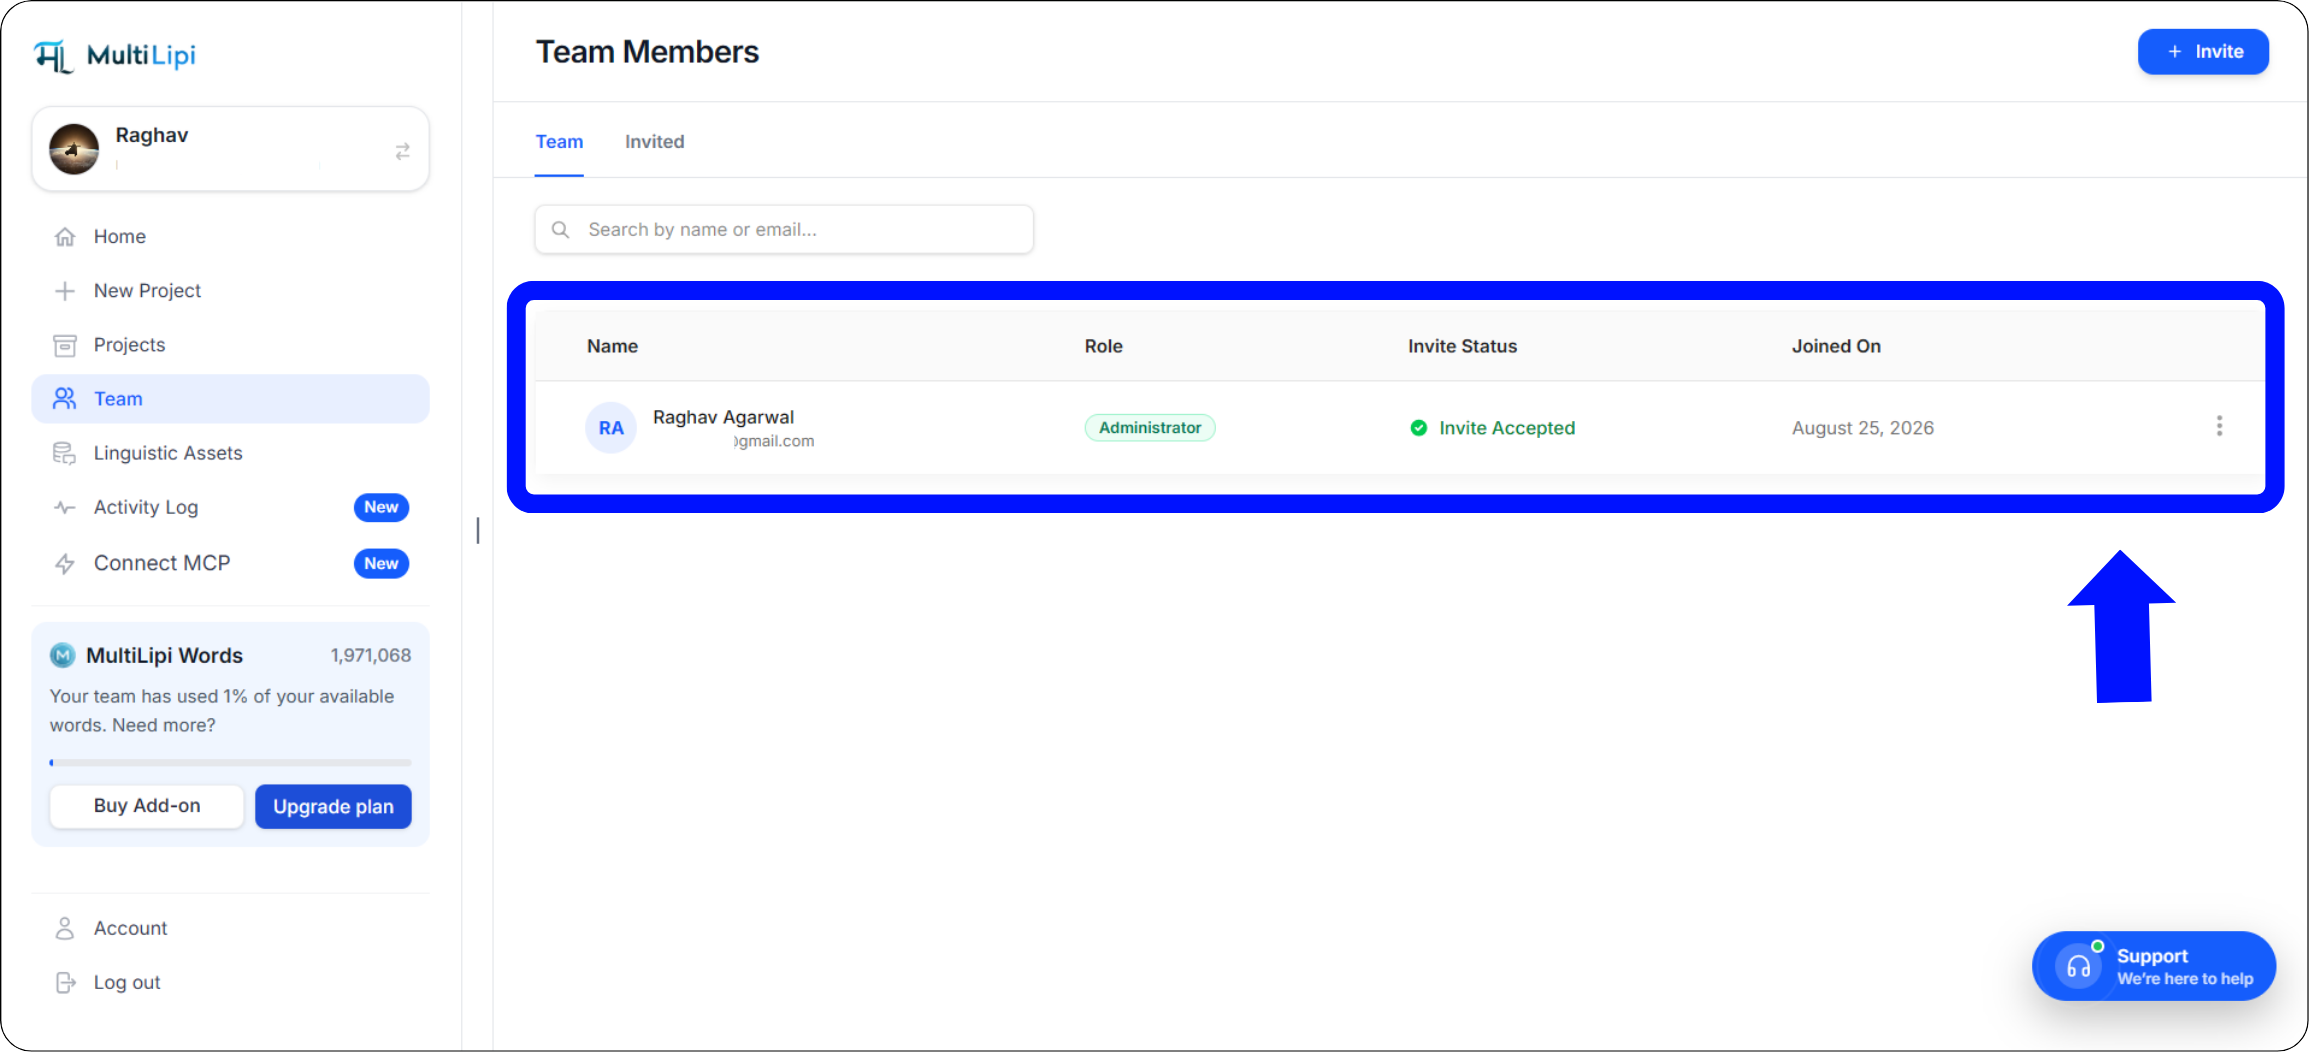
The three-dot action menu on each member row — Edit role/access or Delete to revoke immediately
Best Practices for Team Management
Keep your workspace secure and your pipeline organized.
Apply the Principle of Least Privilege
When assigning roles, always give team members the minimum level of access they need to do their job — nothing more.
Human translators & external contractors
Full access to the Visual Editor and Translation Lists — without the ability to alter domain settings, DNS configurations, or billing details.
Core project managers & technical leads
Full workspace access including project settings, DNS configuration, billing, and team management. Reserve this only for trusted internal leads.
Troubleshooting Common Invitation Issues
Quick resolutions for the most frequent team onboarding scenarios.
"My teammate logged in, but doesn't see the invite."
This almost always occurs when there is a typo in the email address, or the teammate signed up using a different email alias (e.g., using a personal Gmail instead of their corporate email). Verify the exact email address they used to register their MultiLipi account, and re-send the invite to that specific address.
"How do I cancel a pending invitation?"
If you sent an invite to the wrong person or assigned the wrong role, simply navigate back to your Team tab. Locate the pending user under the "Invited" status, click the three vertical dots next to their name, and select Delete to revoke the invitation before they can accept it.
"Can a member belong to multiple workspaces?"
Yes! Freelance translators, SEO specialists, or agency partners can use a single MultiLipi login to accept invitations from multiple different client workspaces. They can seamlessly toggle between these distinct workspaces from their main account dashboard without needing separate passwords.
Summary: Streamlining Your Global Workflow
Secure, fast, organized team collaboration — built in.
Managing a multilingual website should not require endless back-and-forth emails, messy spreadsheets, or sharing sensitive account passwords. By utilizing MultiLipi's centralized Team Management dashboard, you establish a secure, organized environment where developers can handle the technical DNS integrations, while linguists and marketers focus purely on refining translations in the Visual Editor.
Our transition to an entirely in-app invitation flow ensures that your project onboarding remains highly secure, immune to aggressive email spam filters, and incredibly fast — from invite to active collaborator in seconds.
Ready to Bring Your Localization Team Together?
Head over to your Team tab today and invite your first collaborator. Explore these resources to maximize your team's output across every market:
Need help with a custom team configuration? For enterprise-scale workspaces with complex role requirements or SSO needs, contact MultiLipi Support — our team will help you set up the right access structure for your organization.